DESTINATION: MARRAKESH
Transport yourself with a new collection that captures the magic of the Red City.
READ MORETop searches:
Founder & Creative Director François Nars believes that modern makeup should enhance a person’s look without ever dominating or masking their own beauty. Whether you are seeking a no-makeup makeup look that enhances your natural features or a full-coverage, longwearing finish for a special event, creating the perfect look requires an understanding of the precise sequence of makeup application.
This comprehensive guide will walk you through the definitive NARS principles of layering makeup. You will learn how to seamlessly blend liquid foundation, color-correct dark circles, lock your look with setting powder, and build natural dimension that delivers a lit-from-within glow.
Layering is not simply about putting one product on top of another—it is about building thin, intentional veils of coverage that interact seamlessly with the skin. When you apply makeup in the correct sequence, you maximize the performance of each individual product. Primer grips foundation; foundation evens out skin tone; concealer targets specific areas of discoloration; powder locks cream products in place; and bronzer and blush add life and dimension back into the face.
Layering isn’t just about order—it’s also about texture. As a general rule, makeup should be applied from liquid to cream to powder. This ensures each formula blends seamlessly into the skin and performs as intended. Applying liquid or cream products over powder can disrupt the base, causing patchiness or uneven texture. For example, liquid and cream blushes should be applied before powder, while powder blushes are best applied after setting the complexion.
Artist tip: At the same time, artistry allows for nuance. Products like The Multiple are designed for flexibility: it can be applied under foundation for a soft, diffused glow; over foundation for natural luminosity; or even over powder for a more dimensional, editorial finish. The placement depends on the payoff you’re looking to achieve.
By following a structured, step-by-step routine, you ensure that your base is not only beautiful upon initial application, but remains resilient and lasts throughout the day.
Preparing the skin with the appropriate skincare and face primer smooths the skin’s surface, addresses immediate textural concerns, and helps extend the wear of your complexion products.
Begin by cleansing and hydrating the skin based on your specific skin type. Allow your skincare to fully absorb into the skin for several minutes. This waiting period ensures that your moisturizer does not mix with your primer, which can cause pilling or slipping.
Once your skincare has absorbed, apply primer if desired. Primers are formulated to bridge the gap between skincare and makeup. Depending on your primary concern, you might choose a radiant primer, like Radiance Primer SPF 35 or Light Reflecting™ Hydrating Primer, for a lit-from-within glow, or a pore-refining, mattifying primer, like Soft Matte Primer, to smooth uneven texture and control excess sebum. Note that a primer is not always needed if complexion products already perform and wear beautifully on the skin.
Dispense a small amount of primer onto your fingertips. Gently massage it into the skin, focusing on areas where makeup tends to fade or where texture is most prominent, such as the center of the face, the sides of the nose, and the forehead. The warmth of your fingertips will help melt the product into the skin, creating an invisible, gripping shield that is ready to receive color.
Next, it’s time to establish the baseline of your complexion. This step is about evening out your skin tone, neutralizing widespread redness or dullness, and creating a uniform base.
The choice between a liquid foundation or a tinted moisturizer depends on your desired coverage and finish.
Artist tip: When matching your shade, always test the color along your jawline in natural light. The perfect shade will disappear seamlessly into both your face and your neck. Pay close attention to your undertones—whether they are warm (yellow or golden), cool (pink or peach), or neutral (a balance of both)—to avoid an ashy or overly orange appearance.
For liquid foundation or tinted moisturizer, dispense the product onto the back of your hand first. Use your fingertips to warm the liquid foundation—the natural heat from your hands allows the product to melt into the skin for the most natural, seamless finish. Start your application where more coverage is typically needed—usually in the center of the face, around the nose, and the mouth—and blend outward toward the edges of the face. By sheerly blending the product outward, you avoid a harsh line of demarcation at the jawline and hairline.
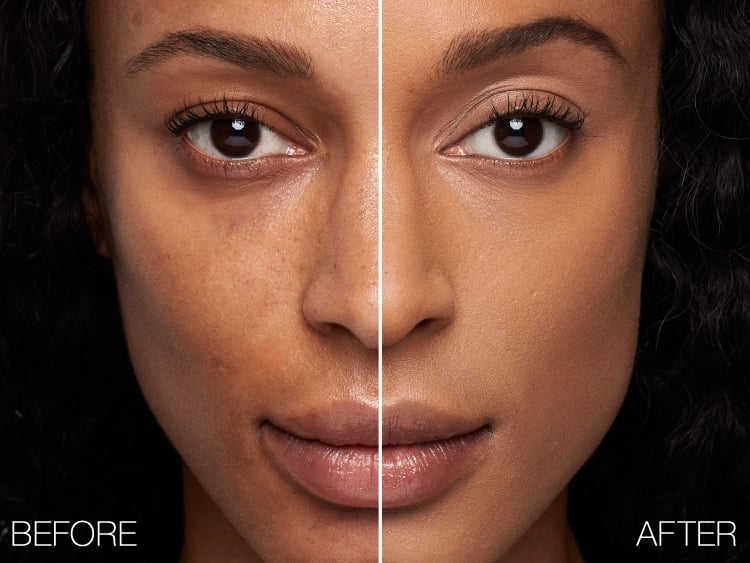
Concealer is your precision tool, made to tackle stubborn discoloration, dark circles, and blemishes, as well as highlight and contour.
Brightening the undereye area requires a delicate touch. The skin here is thin and prone to fine lines, making it susceptible to creasing. Go one to two shades lighter than your foundation with Radiant Creamy Concealer to subtly brighten the eye area, applying a small amount to focus on the deepest part of the dark circle. You can apply directly from the applicator, but blending is key. Use your fingertips or the #10 Radiant Creamy Concealer Brush to gently tap and press the product into the skin.
Artist tip: For dark circles, avoid going too light. Bright concealer applied over deep darkness can turn grey or ash. When circles are very dark, start with a shade closer to the depth of the area to neutralize, then layer a skin‑matching or slightly brightening concealer for lift.
When covering dark spots or active blemishes, use Soft Matte Complete Concealer in a shade that matches your skin tone. Because concealer has more coverage than foundation, use it sparingly. Pinpoint the exact center of the blemish with the #11 Soft Matte Concealer Brush or the tip of the applicator. Tap the edges of the concealer with your finger or brush to blend it seamlessly into the surrounding foundation, leaving the core coverage intact over the spot itself.
One of the most frequently asked questions in beauty is: do you use concealer before or after foundation?
In most cases, apply concealer after foundation. Foundation evens overall tone first, allowing you to precisely target only the areas that still need correction resulting in a more natural finish and less product usage. Exception: If you are using products with different finishes—a radiant foundation paired with a full-coverage matte concealer—spot-conceal first. Applying matte concealer on top of a radiant foundation can create visible texture and finish inconsistencies.
Color corrector is a distinct step from concealer. When needed, corrector is applied sparingly before foundation to neutralize intense discoloration, followed by foundation and skin‑matching concealer for seamless coverage.
Setting your makeup is a critical step to ensure your foundation and concealer remain longwearing, crease-free, and transfer-resistant throughout the day.
Depending on your preference and skin type, you can choose between a loose powder or a pressed powder. Loose setting powder is more fine and excellent for setting the undereye area, while pressed powder is perfect for targeted shine control and on-the-go touch-ups. For the undereye area, Light Reflecting™ Setting Powder (loose or pressed) is ideal—non-drying, blurring, and infused with skincare benefits. For a more matte finish or added coverage, Soft Matte Advanced Perfecting Powder delivers smooth control without heaviness.
The method of application is just as important as the powder itself. Never drag or swipe a brush aggressively across a freshly applied liquid base—this will disrupt the coverage you just built—instead, use a gentle press and stipple motion.
Artist tip: When using a brush, roll it through the powder to help load the bristles evenly with product on all sides. Tap off any excess. Hold the brush closer to the head for more control. This makes it easy to precisely press the powder onto the skin, locking the makeup in place without disturbing the foundation or concealer underneath.
Focus your powder application primarily on the T-zone—forehead, nose, and chin—to mattify and reduce excess shine. For those with dry skin, a very light layer of powder strategically placed only where concealer tends to crease, such as the under-eyes, is sufficient. For oily skin, a more comprehensive all-over dusting may be necessary.
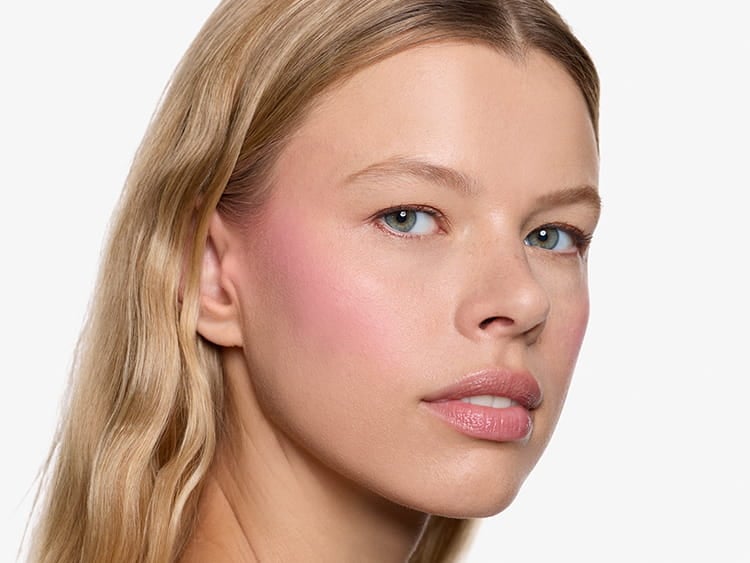
The final step in layering your makeup is to reintroduce natural dimension, shadow, and a flush of color to the face using bronzer and blush.
Bronzer adds warmth and soft, natural-looking definition. To warm skin, sweep Laguna Bronzing Powder over the face from the temple, across the cheek, and along the jawline. Avoid a heavy look by focusing your application on the areas where the sun would naturally hit the face.
Blush brings natural, healthy-looking color that immediately enlivens the complexion. For a youthful flush, apply iconic Powder Blush to the apples of the cheek. To lift and brighten the face, blend from the apples, upward toward the temples, softly wrapping the eye area. Placement can be adjusted based on face shape and desired effect.
When working with blush and bronzer, texture matters as much as placement. Liquid and cream formulas should be applied before powder to ensure a smooth, seamless blend, while powder products are best layered after the complexion has been set. Multi-use products like The Multiple offer more flexibility—it can be layered under foundation for a soft, diffused glow, over foundation for natural luminosity, or even over powder for a more dimensional, editorial finish. The key is choosing placement based on the payoff you want to achieve.
Remember, makeup is deeply personal and highly customizable. Let these NARS principles serve as your foundational guide, but never be afraid to adapt the amount of coverage, the placement of color, and the finishes you choose to suit your unique features and style.